Managing & Accessing Project Files
Orepath Elements allows users to create, open, copy, rename, and organise project files locally on the user's desktop using the Navigation Pane and Details Pane. These areas work in a similar way to Windows Explorer.
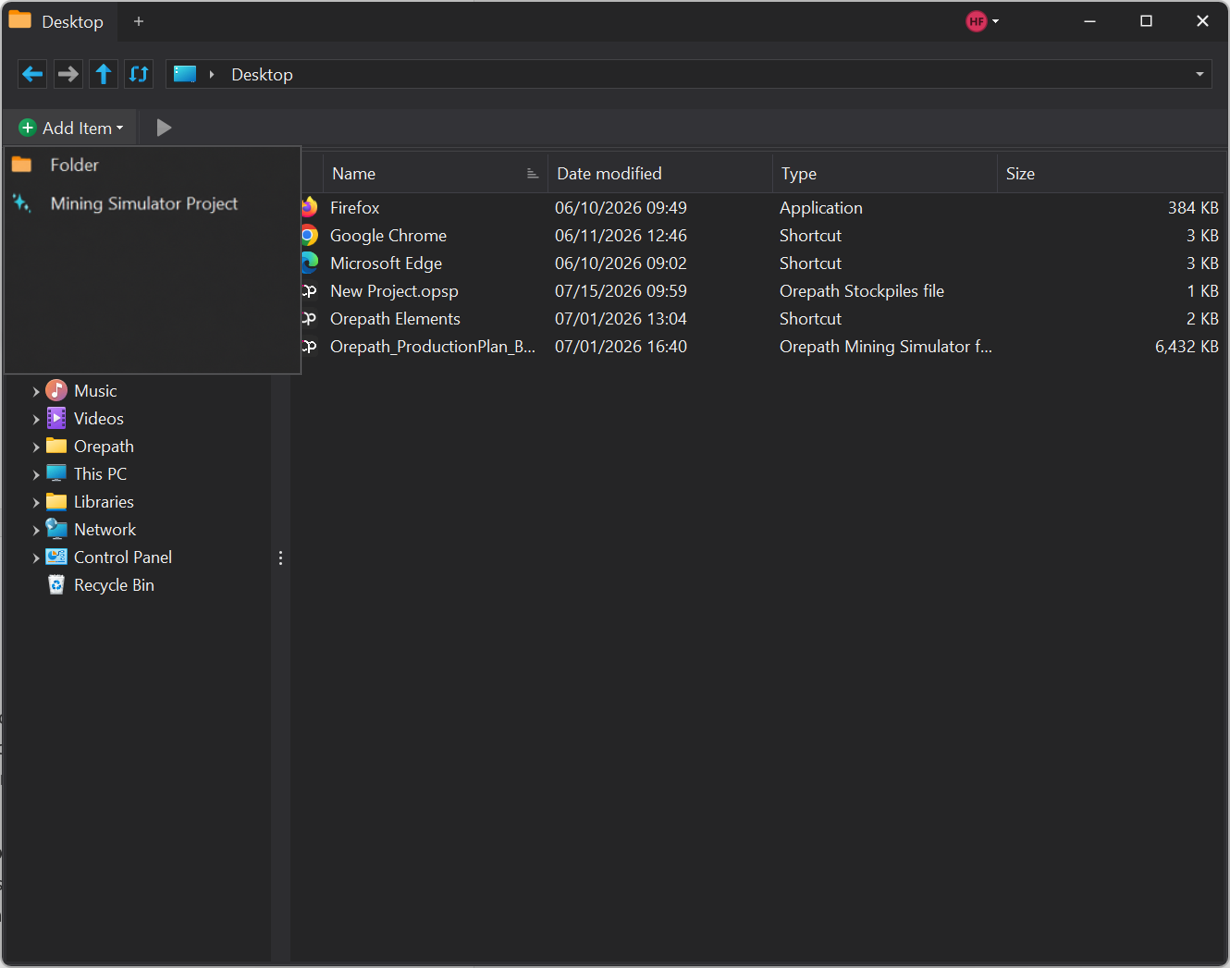
Project files are stored in the selected folder location on the user’s local computer or in an accessible network location. Files are not stored in the user’s Orepath Elements account. The main areas used to manage project files are:
| Area | Purpose |
|---|---|
| Toolbar | Used to create new folders and Mining Simulator project files. |
| Navigation Pane | Used to browse available folders and locations on the computer or network. |
| Details Pane | Displays the files and folders contained in the selected location. |
When a file or folder is created, copied, renamed, moved, or deleted in Orepath Elements, the change is applied to the actual file or folder in the selected local or network location.
Orepath Elements displays and manages files from the selected computer or network folder. It does not create a separate cloud copy or store the files in the user's Elements account.
Opening a Folder
Use the Navigation Pane to locate and open the folder that contains the required project files. To open a folder:
- Locate the Navigation Pane on the left side of the screen.
- Select the required location, such as Desktop, Documents, Downloads, Network, or another available folder.
- Select the folder you want to open.
- The contents of the selected folder will appear in the Details Pane.
- Review the displayed files and folders before opening, copying, renaming, or deleting any item. The Details Pane may display the following columns:
| Column | Description |
|---|---|
| Name | The name of the file or folder. |
| Date Modified | The date and time when the item was last changed. |
| Type | The type of item, such as a folder, shortcut, backup file, or Mining Simulator project file. |
| Size | The size of the file, where applicable. |
Use the file name, revision number, and date modified to confirm that you have selected the correct project file.
Creating a New Folder
Create folders to organise project models, reference information, test scenarios, and archived project versions.
To create a new folder:
- In the Navigation Pane, select the location where the new folder should be created.
- Confirm that the correct location is displayed in the Details Pane.
- Select the green Add Item button in the Toolbar.
- Select Folder.
- Enter a clear and meaningful folder name.
- Confirm the name to create the folder.
The new folder will appear in the Details Pane and will be stored in the selected local or network location.
Use folder names that clearly describe their purpose. For example:
- Active Models
- Reference Files
- Sandbox Models
- Archive
Creating a New Project File
Create a new project file when starting a new Orepath Mining Simulator model, scenario, or analysis.
To create a new project file:
- Use the Navigation Pane to navigate to the folder where the new project should be saved.
- Confirm that the correct folder is open in the Details Pane.
- Select the green Add Item button in the Toolbar.
- Select Mining Simulator Project.
- Enter a clear and meaningful project name.
- Confirm the name to create the project file.
- The new project file will appear in the Details Pane.
- Double-click the project file, or select the file and click the play button, to open it in Orepath Elements.
The project file is stored in the selected folder on the local computer or network location.
Use a clear naming convention so that users can identify the project, scenario, and version without opening the file.
A recommended naming format is:
[Project Name]_[Scenario or Area]_[Description]_[Version]
For example:
Orepath_ProductionPlan_BaseCase_Rev01
Opening an Existing Project
To open an existing project:
- Use the Navigation Pane to navigate to the folder where the project file is stored.
- Locate the required project file in the Details Pane.
- Check the project name, scenario, and revision number.
- Review the Date Modified column to confirm that you have selected the intended version.
- Double-click the project file, or select the file and click the play button, to open it in Orepath Elements.
Before making changes, always confirm that you have opened the correct project and revision. This is especially important when several project versions, scenarios, or test files are stored in the same folder.
Copying a Project to Another Location
You can copy an existing project from one folder or location to another.
This is useful when you need to create a backup, move a project into a working folder, or create a separate version before making changes.
To copy a project:
- Use the Navigation Pane to navigate to the folder where the original project file is stored.
- In the Details Pane, locate and select the project file that you want to copy.
- Right-click the selected project file.
- Select Copy from the context menu.
- Use the Navigation Pane to navigate to the folder where the copied project should be stored.
- Right-click an empty area in the Details Pane.
- Select Paste.
A copy of the project file will appear in the selected folder.
Copying a project creates a separate file. Changes made to the copied project will not affect the original project in its initial location.
After copying the project, rename it if necessary so that its purpose or revision is clear.
For example:
- Orepath_BaseCase_Rev01
- Orepath_BaseCase_Rev02
- Orepath_HighProductionScenario
- Orepath_Sandbox_Test
Creating a Copy Within the Same Location
Create a copy of a project before making major changes, testing assumptions, or creating an alternative scenario. This protects the original project and allows changes to be tested separately.
Examples of changes that may require a copy include:
- Testing a different production schedule.
- Changing equipment assumptions.
- Testing alternative haul routes.
- Creating a new scenario.
- Making experimental or temporary changes.
To create a copy within the same folder:
- Navigate to the folder containing the original project.
- Select the project file in the Details Pane.
- Right-click the file.
- Select Copy.
- Right-click an empty area in the Details Pane.
- Select Paste.
- Rename the copied project to clearly identify its purpose.
Do not make major or untested changes directly to an approved or original project file.
Renaming a Project or Folder
Rename a project file or folder when its name no longer clearly describes its purpose, scenario, or revision.
To rename a project or folder:
- Navigate to the folder containing the item.
- Select the project file or folder in the Details Pane.
- Right-click the selected item.
- Select Rename from the context menu.
- Enter the new name.
- Press Enter or select the confirmation option.
The new name will apply to the actual file or folder in the selected local or network location.
Before renaming a project, ensure that the project is closed. Renaming a file while it is open may cause confusion or make it more difficult for other users to identify the current version.
Use revision names consistently. For example:
- Orepath_BaseCase_Rev01
- Orepath_BaseCase_Rev02
- Orepath_BaseCase_Rev03
Avoid unclear names such as:
- New Project
- Final Final
- Test 2
- Updated Version
- Copy of Project
These names do not clearly identify the purpose or revision status of the project.
Recommended Project Folder Structure
A clear folder structure makes it easier to find the correct project file and reduces the risk of editing the wrong version.
A typical project folder structure may be organised as follows:
Project Name
│
├── Active Models
│   ├── Orepath_BaseCase_Rev01
│   └── Orepath_ProductionPlan_Rev02
│
├── Reference Files
│   ├── Equipment Data
│   ├── Haul Route Information
│   └── Planning Assumptions
│
├── Sandbox Models
│   ├── Orepath_HighProductionScenario
│   └── Orepath_TestEquipmentChange
│
└── Archive
    ├── Orepath_BaseCase_Rev00
    └── Orepath_PreviousScenario
| Folder | Purpose |
|---|---|
| Active Models | Stores the current project models used for analysis, planning, or reporting. |
| Reference Files | Stores supporting information, input data, assumptions, and related documents. |
| Sandbox Models | Stores copies used for testing, training, or alternative scenarios. |
| Archive | Stores older, superseded, or completed project versions retained for reference. |
Working with Shared Project Files
Projects stored in a shared network location may be accessible to other authorised users. Before editing a shared project, communicate with relevant team members to reduce the risk of conflicting changes.
Before editing a shared project:
- Confirm that you are working on the correct project file and revision.
- Check whether another user is currently working on the same project.
- Create a copy before testing major changes or alternative assumptions.
- Save changes regularly while working.
- Create a new revision when significant changes are complete.
- Inform relevant team members when an updated version is available.
For example, rather than replacing an existing project named:
Orepath_BaseCase_Rev01
create and work on a new revision:
Orepath_BaseCase_Rev02
This creates a clear record of changes and allows users to return to an earlier version when required.
Good File-Management Practices
When using Orepath Elements, follow these practices:
- Save project files in the correct local or network folder.
- Use clear and consistent names for all files and folders.
- Confirm the project name and revision before opening or editing a file.
- Create a copy before making significant or experimental changes.
- Keep approved models separate from test or sandbox models.
- Store superseded versions in the Archive folder.
- Avoid deleting project files unless they are no longer required.
- Communicate with other users when working on shared project files.
- Remember that files displayed in Orepath Elements are stored in the selected local or network folder, similar to files viewed through Windows Explorer.